> ## Documentation Index
> Fetch the complete documentation index at: https://docs-legacy.famulor.io/llms.txt
> Use this file to discover all available pages before exploring further.
# MCP Client
> Connect Famulor MCP to ChatGPT, Claude, Cursor, and other MCP-compatible clients
# MCP Client Setup
Connect the hosted Famulor MCP server to your AI client in a few steps. The full developer endpoint supports broad platform operations, while the consumer profile for ChatGPT and Claude is limited to reading assistants and history.
* *"Create an inbound receptionist that books appointments."*
* *"Show me why my last campaign call failed."*
* *"Add three leads to my follow-up campaign and start it."*
After setup, sign in to your Famulor account in the browser and approve the displayed permissions. No API key is required for the hosted OAuth flow.
Capabilities, auth, and self-hosting
Sign in to your workspace
Full connector guide with screenshots
## What the full developer endpoint can do
Inbound and outbound: system prompt, voice, language, model and call behaviour. Attach
knowledge bases (your documents) and mid-call tools (live API lookups during a call).
Create campaigns, add and manage leads, and start, pause or resume them.
List calls, read full transcripts and post-call evaluations, then update the assistant or its
tools — a complete build → review → improve loop.
Knowledge bases & documents, phone numbers & SIP trunks, WhatsApp senders & templates,
conversations, folders, labels, API keys and your blacklist.
Read and write are separate tools. The full endpoint includes actions that can spend balance or
delete data, so use it only with a trusted developer client and review every confirmation. Integration
secrets (for example auth tokens on mid-call tools) are masked in responses. The Assistant & History
profile exposes none of those actions.
## Server URL
**Full developer endpoint:** `https://app.famulor.io/mcp`
**Assistant & History profile:** `https://app.famulor.io/mcp?profile=assistant-history`
Use the restricted Assistant & History profile for ChatGPT and Claude directory or consumer-facing connections. It exposes 11 read-only tools for assistant configuration and omnichannel call, messaging, and email history. Use the full endpoint only in developer clients when you intentionally need the broader write-capable tool catalog.
## Before you start
* A **Famulor account** at [app.famulor.io](https://app.famulor.io).
* An **active plan** for the features you use (some actions consume call minutes or chat credits).
## Quick start
1. Add the server in your client (see [ChatGPT](#chatgpt), [Claude](#claude), or [other clients](#other-clients) below).
2. When prompted, sign in to Famulor in the browser and approve the requested permissions.
3. Ask in natural language, e.g. *"Show my last 10 calls"* or *"List my assistants"*.
Authentication uses standard MCP OAuth 2.1 (PKCE). The hosted flow uses your normal Famulor account session and does not ask you to paste an API key. Access tokens expire after 30 days; your client will prompt you to sign in again.
## ChatGPT
Famulor is available as a **custom app** in ChatGPT (web). You need a ChatGPT plan that supports apps/connectors and **Developer mode** enabled.
### Add the Famulor app
1. Open **ChatGPT** → **Settings** → **Apps** (or **Connectors**).
2. Click **Create app** / **New app**.
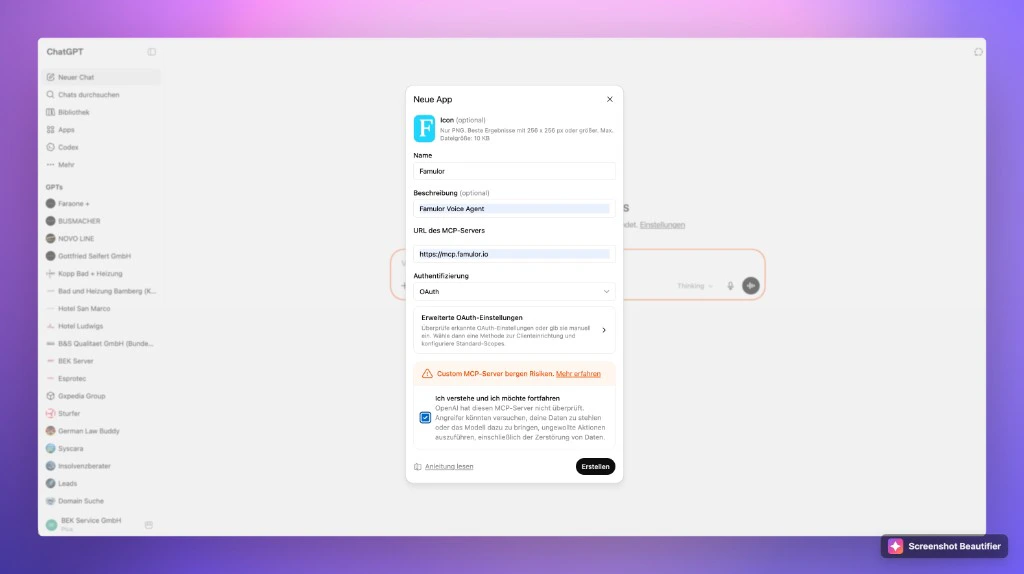
3. Fill in:
| Field | Value |
| ------------------ | --------------------------------------------------------------- |
| **Name** | `Famulor` |
| **Description** | `Review Famulor assistants and conversation history` (optional) |
| **MCP server URL** | `https://app.famulor.io/mcp?profile=assistant-history` |
| **Authentication** | **OAuth** |
4. Confirm the security notice and click **Create**.
5. Sign in to Famulor and approve the requested read-only permissions.
 ### Use Famulor in a chat
1. Start a new chat and enable **Developer mode** if required.
2. Select **Famulor** from the tools/apps menu in the composer.
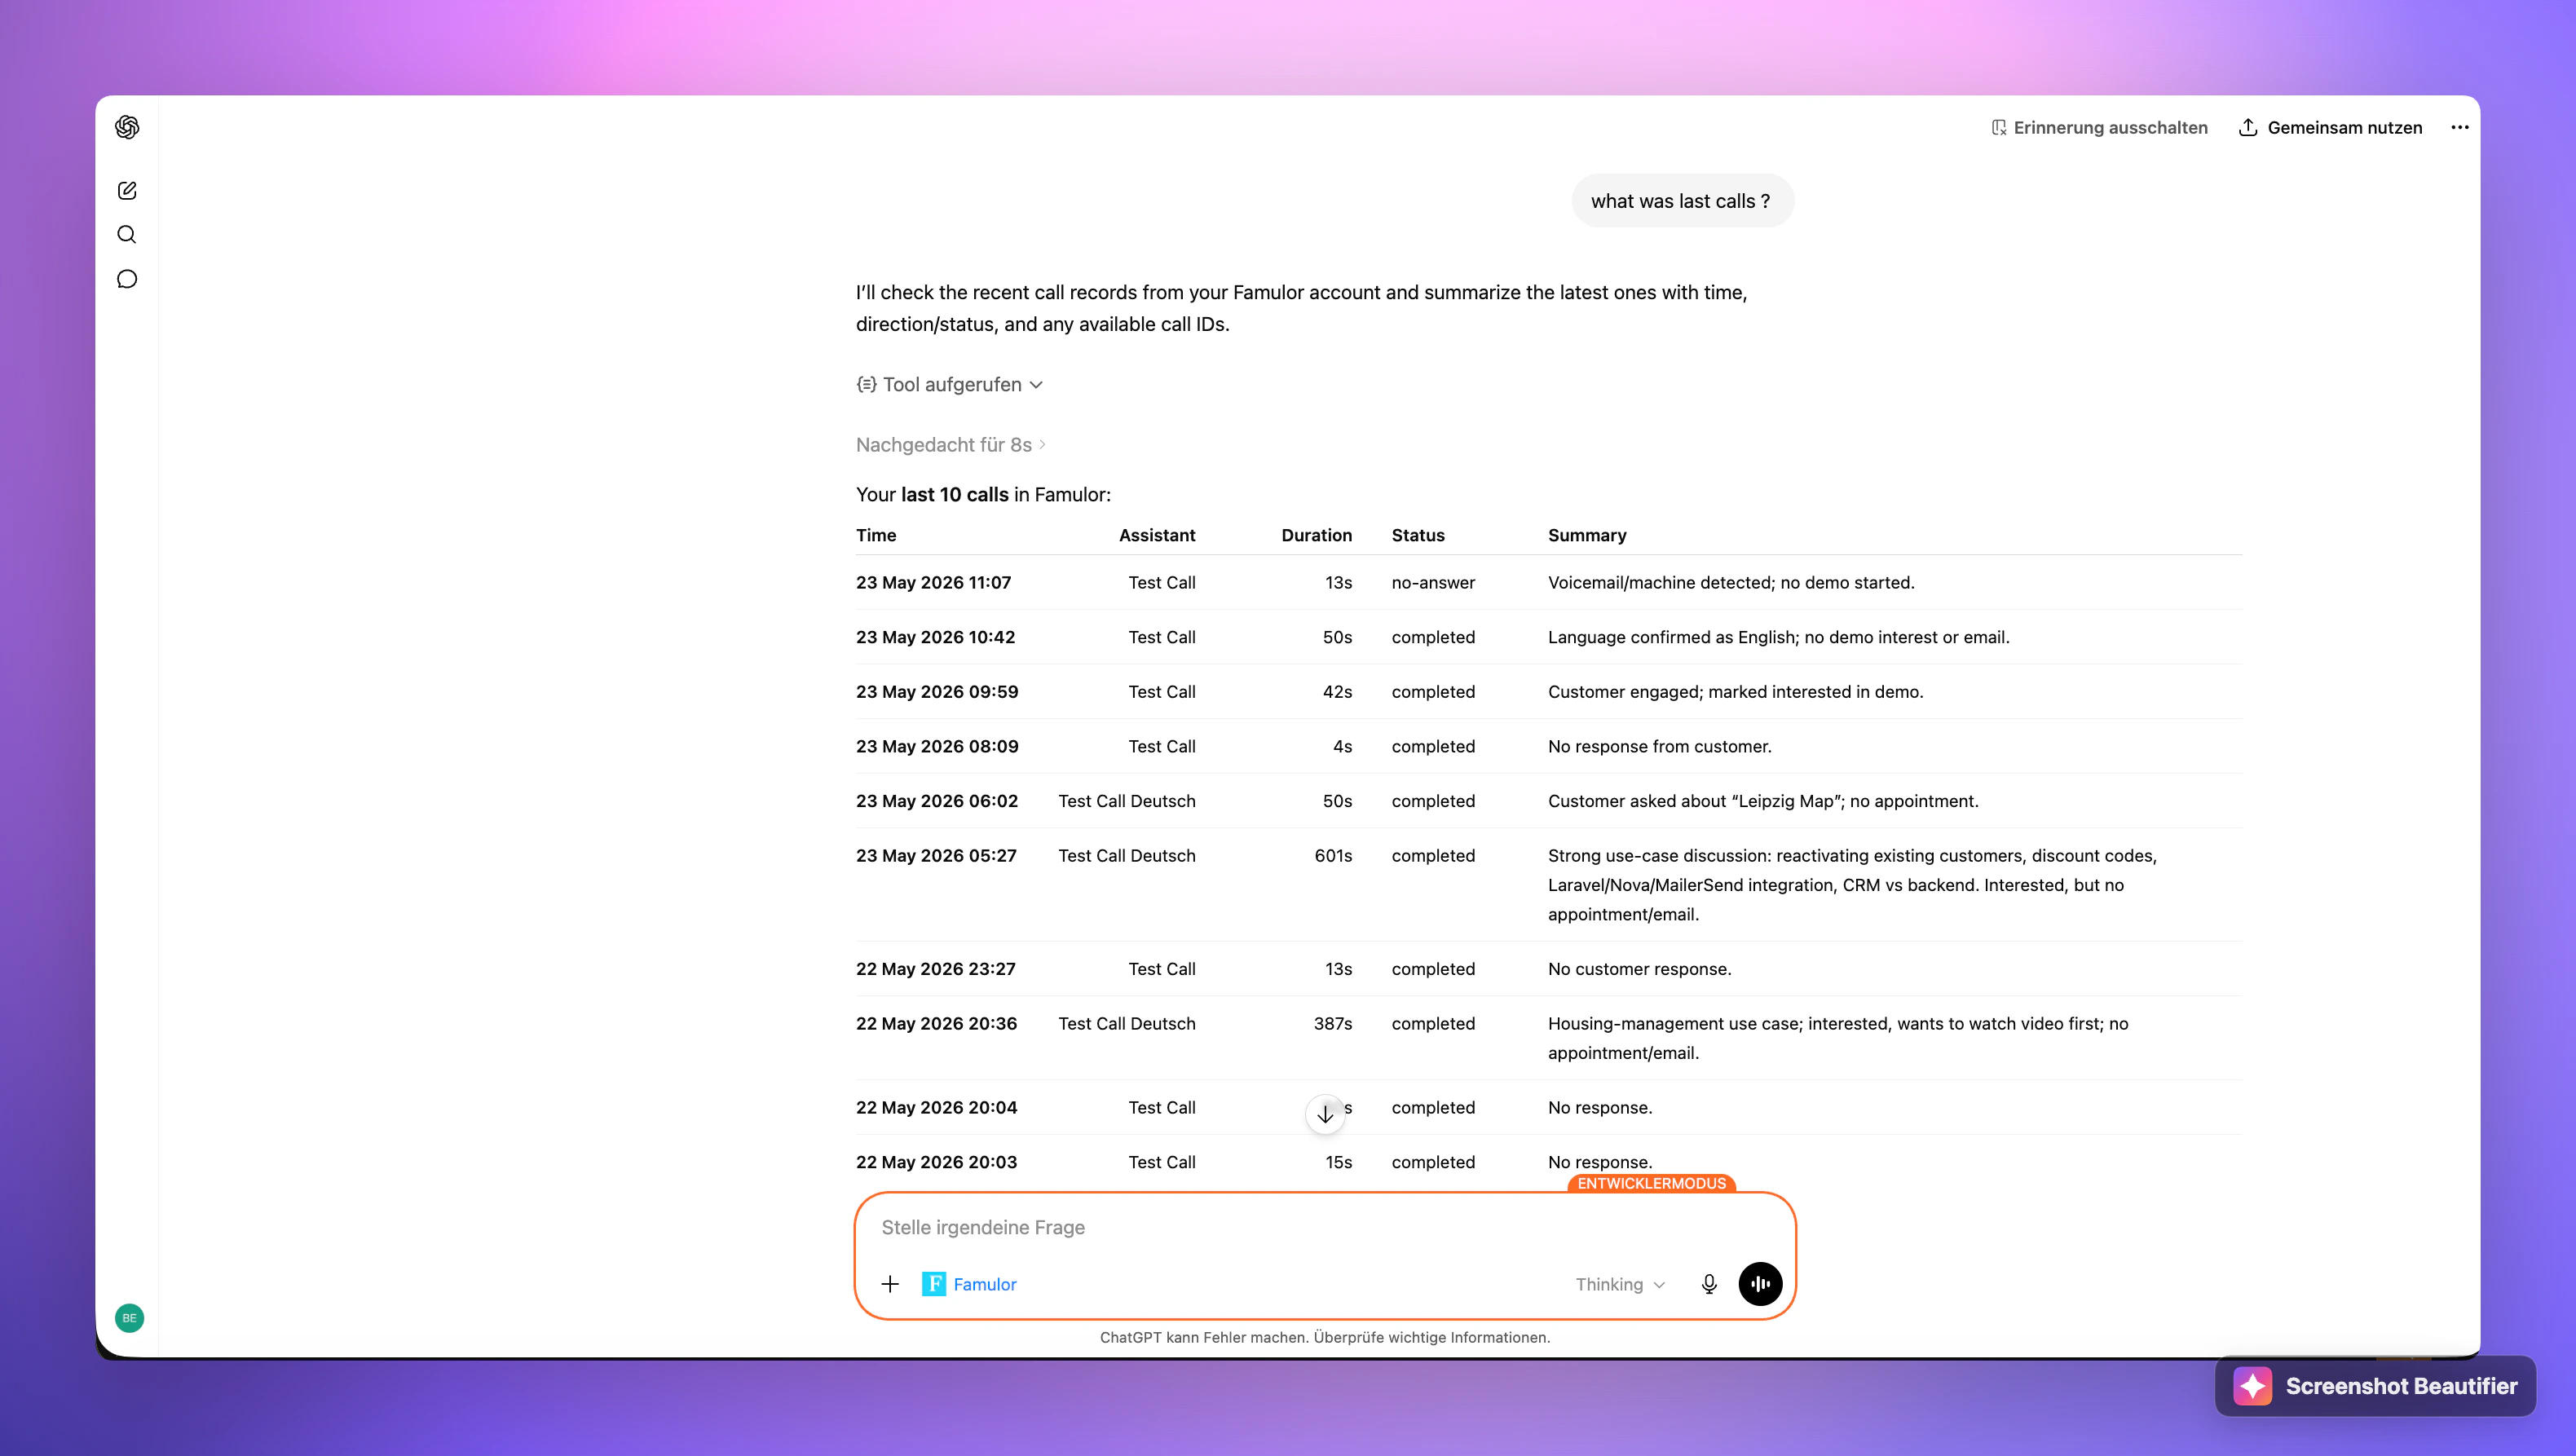
3. Ask questions about your account — e.g. *"What were my last calls?"*
### Use Famulor in a chat
1. Start a new chat and enable **Developer mode** if required.
2. Select **Famulor** from the tools/apps menu in the composer.
3. Ask questions about your account — e.g. *"What were my last calls?"*
 ### Step-by-step with screenshots
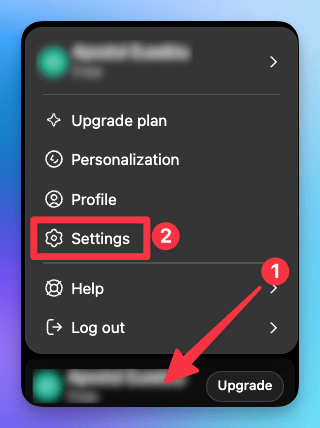
In ChatGPT, click your name at the bottom-left, then **Settings**.
### Step-by-step with screenshots
In ChatGPT, click your name at the bottom-left, then **Settings**.
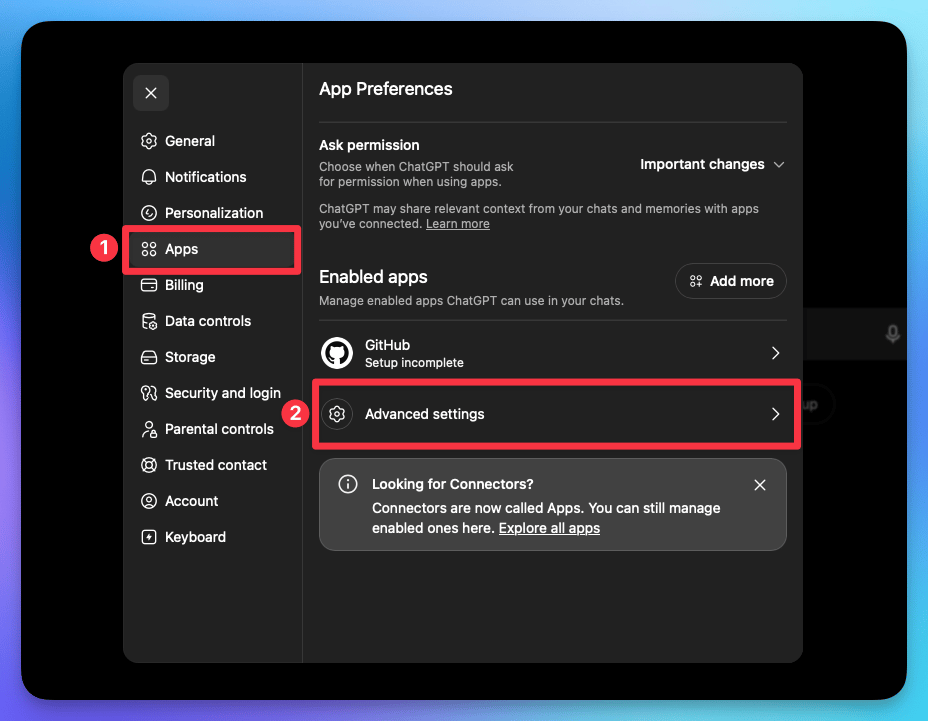
 Open the **Apps** tab (connectors now live under "Apps"), then open **Advanced settings**.
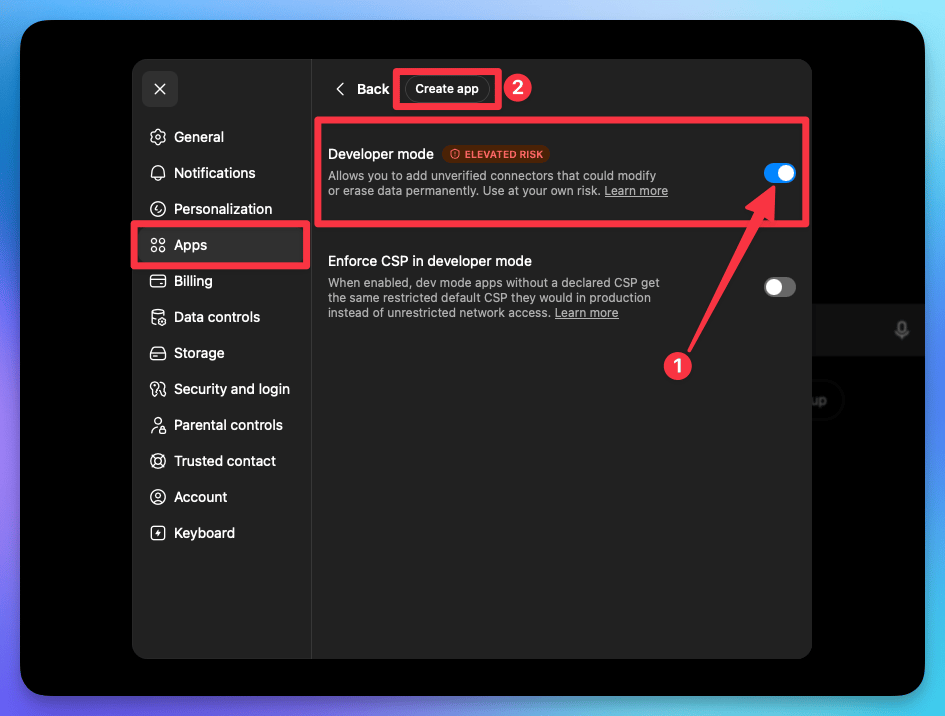
 Switch on **Developer mode** (this lets you add a custom connector), then click **Create app**
at the top.
Switch on **Developer mode** (this lets you add a custom connector), then click **Create app**
at the top.
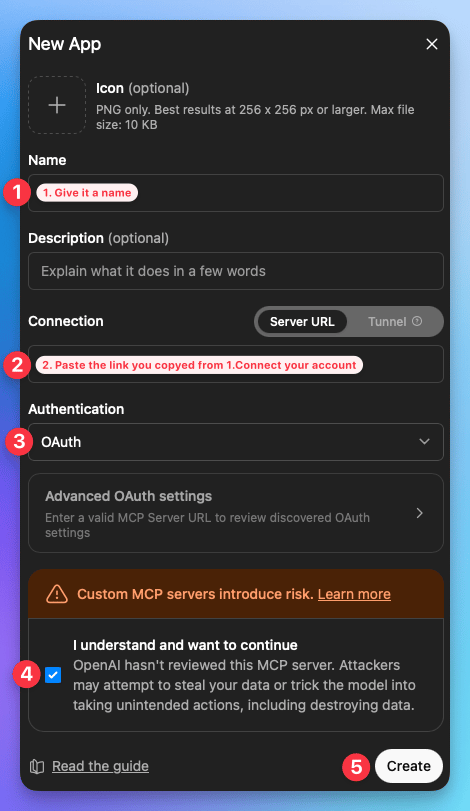
 Give it a name, paste `https://app.famulor.io/mcp?profile=assistant-history` into the **Server URL** field, set
**Authentication** to **OAuth**, tick *"I understand and want to continue"*, then **Create**.
Give it a name, paste `https://app.famulor.io/mcp?profile=assistant-history` into the **Server URL** field, set
**Authentication** to **OAuth**, tick *"I understand and want to continue"*, then **Create**.
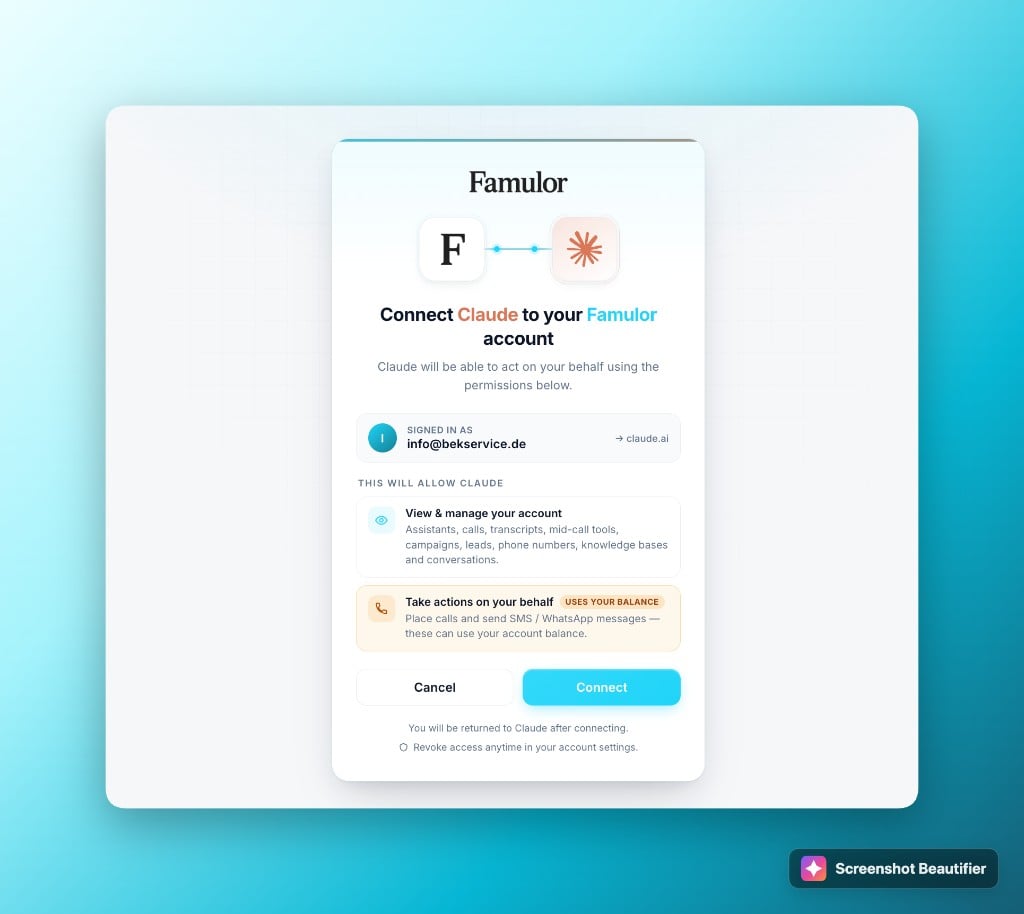
 Your browser opens Famulor's OAuth consent screen. Sign in, review the read-only permissions,
then click **Connect**.
Your browser opens Famulor's OAuth consent screen. Sign in, review the read-only permissions,
then click **Connect**.
 ## Claude
Famulor works in **Claude Desktop** (custom connector) and **Claude Code** (CLI). Both use OAuth through your normal Famulor account.
### Claude Desktop
1. Open **Claude** → **Settings** → **Connectors**.
2. Click **Add custom connector**.
3. Fill in:
| Field | Value |
| -------- | ------------------------------------------------------ |
| **Name** | `Famulor` |
| **URL** | `https://app.famulor.io/mcp?profile=assistant-history` |
4. Click **Add**, then complete OAuth sign-in in the browser.
## Claude
Famulor works in **Claude Desktop** (custom connector) and **Claude Code** (CLI). Both use OAuth through your normal Famulor account.
### Claude Desktop
1. Open **Claude** → **Settings** → **Connectors**.
2. Click **Add custom connector**.
3. Fill in:
| Field | Value |
| -------- | ------------------------------------------------------ |
| **Name** | `Famulor` |
| **URL** | `https://app.famulor.io/mcp?profile=assistant-history` |
4. Click **Add**, then complete OAuth sign-in in the browser.
 ### Use Famulor in Claude
1. Start a new chat and enable the **Famulor** connector for the conversation.
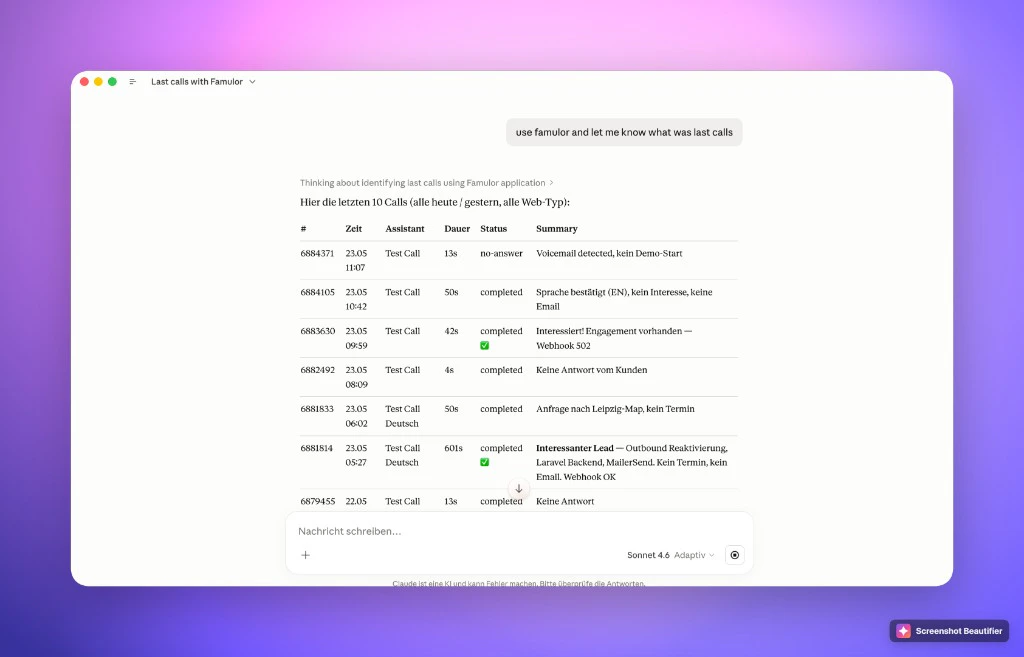
2. Ask in natural language — e.g. *"Use Famulor and show me my last calls"*.
### Use Famulor in Claude
1. Start a new chat and enable the **Famulor** connector for the conversation.
2. Ask in natural language — e.g. *"Use Famulor and show me my last calls"*.
 ### Step-by-step with screenshots
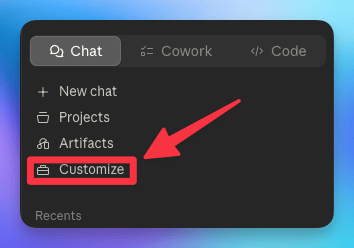
In Claude, open the left sidebar and click **Customize**.
### Step-by-step with screenshots
In Claude, open the left sidebar and click **Customize**.
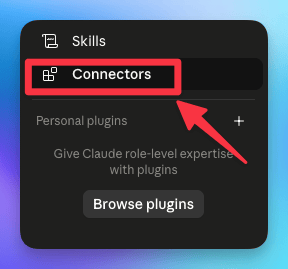
 In the Customize panel, click **Connectors**.
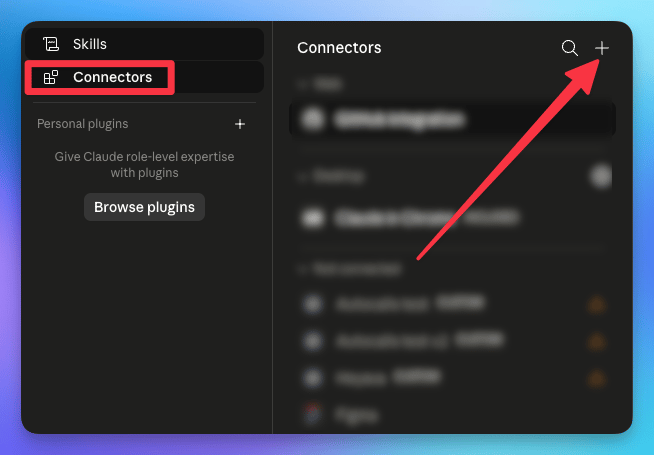
 Click the **+** button in the top-right of the Connectors panel, then choose **Add custom
connector**.
Click the **+** button in the top-right of the Connectors panel, then choose **Add custom
connector**.
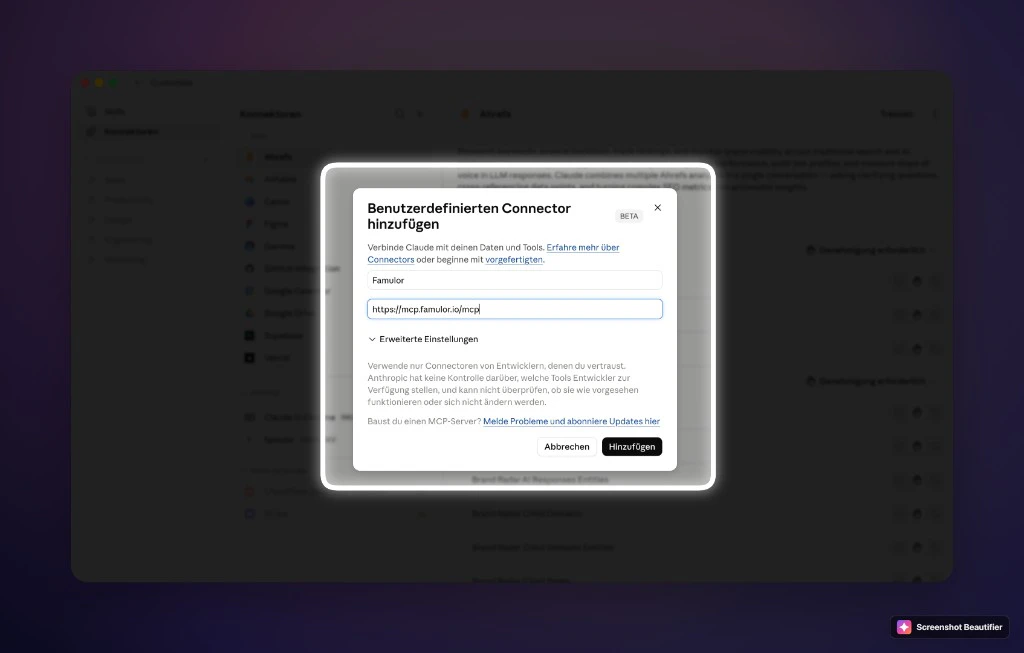
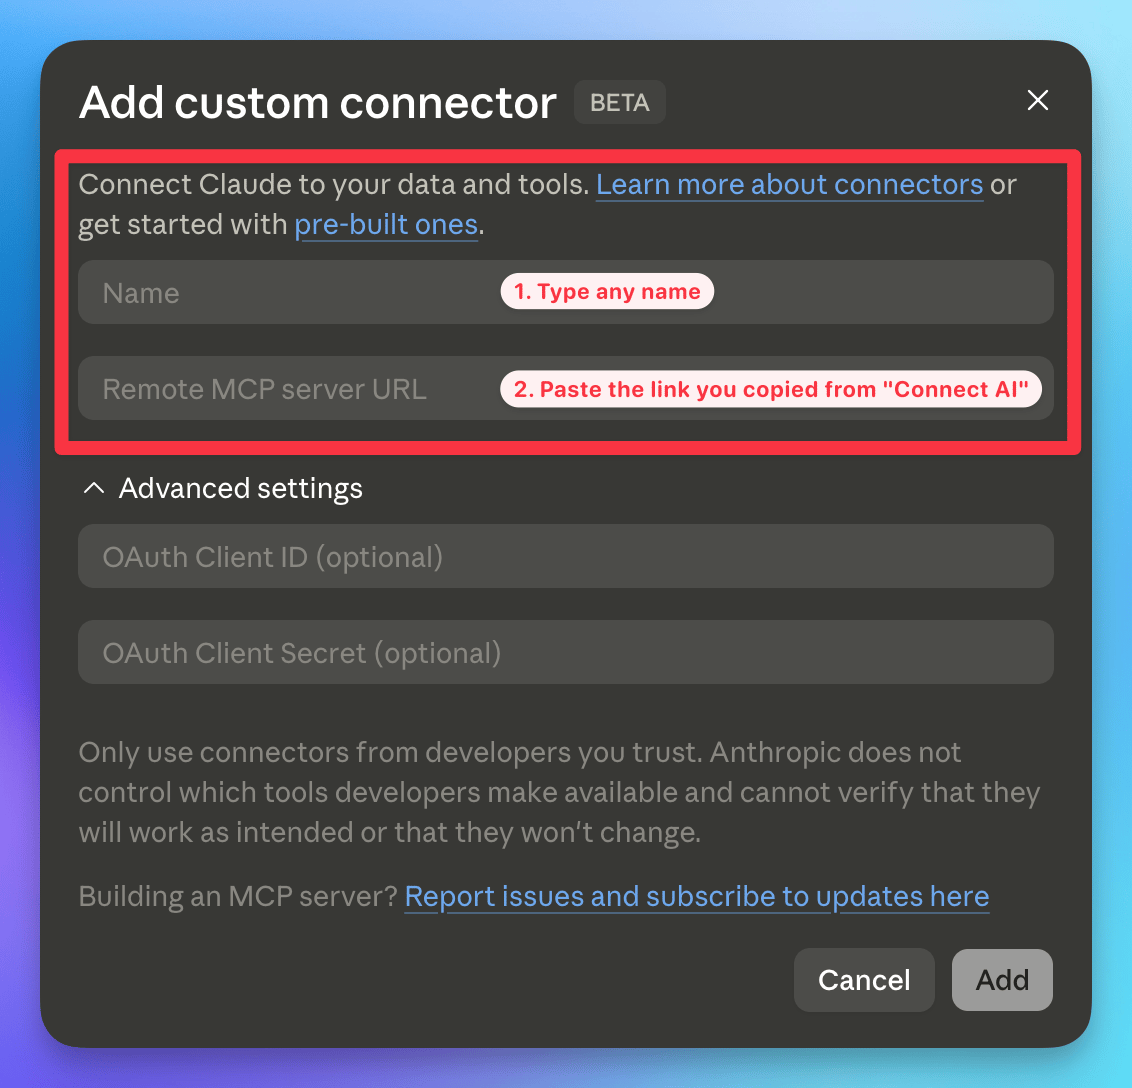
 Type any name (e.g. *Famulor*), paste `https://app.famulor.io/mcp?profile=assistant-history` into **Remote MCP server URL**,
leave the OAuth fields empty, then click **Add**.
Type any name (e.g. *Famulor*), paste `https://app.famulor.io/mcp?profile=assistant-history` into **Remote MCP server URL**,
leave the OAuth fields empty, then click **Add**.
 After you click **Add**, your browser opens Famulor's OAuth consent screen. Sign in, review the
read-only permissions, then click **Connect**.
Once the connector is listed in the Claude and ChatGPT directories, you'll also be able to add it in
one click by searching for **Famulor** under Settings → Connectors — no manual URL needed.
## CLI clients — Claude Code, Codex, Gemini CLI
Add the full hosted server to a CLI agent, then sign in to Famulor in the browser when prompted:
```bash theme={null}
# Claude Code
claude mcp add --transport http famulor https://app.famulor.io/mcp
# OpenAI Codex
codex mcp add famulor --url https://app.famulor.io/mcp && codex mcp login famulor
# Gemini CLI
gemini mcp add --transport http famulor https://app.famulor.io/mcp
```
Prefer a full onboarding agent over raw tools? Install the **Famulor Skill** (works with Claude Code, Cursor, Codex, OpenClaw, Hermes and more): `npx skills add bekservice/Famulor-Skill` — see [Famulor Skill](/en/mcp/famulor-skill).
## Other clients
**One-click install:** [Add to Cursor](cursor://anysphere.cursor-deeplink/mcp/install?name=famulor\&config=eyJ0eXBlIjoiaHR0cCIsInVybCI6Imh0dHBzOi8vYXBwLmZhbXVsb3IuaW8vbWNwIn0%3D) · [Add to VS Code](https://vscode.dev/redirect/mcp/install?name=famulor\&config=%7B%22type%22%3A%22http%22%2C%22url%22%3A%22https%3A%2F%2Fapp.famulor.io%2Fmcp%22%7D)
**Global:** Cursor **Settings → Tools & MCP → New MCP Server** (opens `~/.cursor/mcp.json`)
**Project:** create `.cursor/mcp.json` in your project root.
```json theme={null}
{
"mcpServers": {
"famulor": {
"type": "http",
"url": "https://app.famulor.io/mcp"
}
}
}
```
Refresh MCP in settings after saving. Sign in to Famulor in the browser when prompted.
### Windsurf
`~/.codeium/windsurf/mcp_config.json`
```json theme={null}
{
"mcpServers": {
"famulor": {
"serverUrl": "https://app.famulor.io/mcp"
}
}
}
```
### VS Code
`.vscode/mcp.json`
```json theme={null}
{
"servers": {
"famulor": {
"type": "http",
"url": "https://app.famulor.io/mcp"
}
}
}
```
### Cline
**Cline extension → MCP Servers → Configure**
```json theme={null}
{
"mcpServers": {
"famulor": {
"url": "https://app.famulor.io/mcp"
}
}
}
```
### Continue
`~/.continue/config.yaml`
```yaml theme={null}
mcpServers:
- name: famulor
type: streamable-http
url: "https://app.famulor.io/mcp"
```
### Zed
`~/.config/zed/settings.json`
```json theme={null}
{
"context_servers": {
"famulor": {
"command": "npx",
"args": ["-y", "mcp-remote@latest", "https://app.famulor.io/mcp"]
}
}
}
```
## Try it
Start a new chat with the Assistant & History profile and ask, for example:
"List my assistants and summarize how each one is configured."
"Read my last 5 calls and tell me what my assistant got wrong."
"Show the latest WhatsApp and Instagram conversations that need attention."
"Summarize the latest email thread with this customer."
With the **full developer endpoint** in a trusted developer client, you can also use prompts such as:
* *"Create a German sales assistant using GPT-4.1-mini and the Susi voice"*
* *"Start campaign #42 and add these 50 leads"*
* *"Show me all calls today where the goal wasn't reached"*
* *"What were my last calls?"*
## Security & privacy
* **OAuth 2.1** with a branded consent screen — the hosted flow does not require an API key.
* **Scoped to your account** — the connector can only see and change your own data.
* **Secrets masked** — auth tokens stored on your tools are never returned in plain text.
* **No chat-history harvesting** — the connector acts only on your Famulor resources.
* Privacy policy: [famulor.io/privacy](https://www.famulor.io/privacy).
## Self-hosting
To run your own instance instead of the hosted server, see [MCP Server — Self-hosting](/en/mcp/server#self-hosting).
## FAQ
This page covers **ChatGPT**, **Claude**, CLI agents, and other MCP clients such as Cursor or
VS Code. For a full connector walkthrough with screenshots, see
[Claude & ChatGPT Connector](/en/automation/mcp-connector).
No. The hosted MCP server uses your normal Famulor account through OAuth. API keys remain
available for server-to-server REST API integrations, but they are not part of this connector flow.
The Assistant & History profile is limited to your authenticated workspace and has no write,
purchase, send, call, campaign, delete, telephony, settings, or billing tools. The full developer
endpoint should be used only in a trusted client with confirmations enabled.
No. The Assistant & History profile cannot place calls, send messages, start campaigns, buy
phone numbers, or perform any other balance-consuming action. The full developer endpoint can.
## Troubleshooting
### OAuth / sign-in fails
* Sign out of Famulor in the browser, then start the connector authorization again.
* Try signing in again — tokens expire after 30 days.
* For ChatGPT, ensure **Developer mode** is on and OAuth is selected.
### Server not connecting
* For ChatGPT/Claude, use `https://app.famulor.io/mcp?profile=assistant-history`. The full developer endpoint remains `https://app.famulor.io/mcp`.
* Check health: [https://app.famulor.io/health](https://app.famulor.io/health)
* Restart your client and refresh MCP servers (Cursor: **Settings → MCP → Refresh**).
### Tools not appearing
* Complete OAuth sign-in after adding the server.
* In ChatGPT, ensure the **Famulor** app is selected for the current chat.
Related pages: [MCP Server](/en/mcp/server), [Claude & ChatGPT Connector](/en/automation/mcp-connector), [Famulor Skill](/en/mcp/famulor-skill).
After you click **Add**, your browser opens Famulor's OAuth consent screen. Sign in, review the
read-only permissions, then click **Connect**.
Once the connector is listed in the Claude and ChatGPT directories, you'll also be able to add it in
one click by searching for **Famulor** under Settings → Connectors — no manual URL needed.
## CLI clients — Claude Code, Codex, Gemini CLI
Add the full hosted server to a CLI agent, then sign in to Famulor in the browser when prompted:
```bash theme={null}
# Claude Code
claude mcp add --transport http famulor https://app.famulor.io/mcp
# OpenAI Codex
codex mcp add famulor --url https://app.famulor.io/mcp && codex mcp login famulor
# Gemini CLI
gemini mcp add --transport http famulor https://app.famulor.io/mcp
```
Prefer a full onboarding agent over raw tools? Install the **Famulor Skill** (works with Claude Code, Cursor, Codex, OpenClaw, Hermes and more): `npx skills add bekservice/Famulor-Skill` — see [Famulor Skill](/en/mcp/famulor-skill).
## Other clients
**One-click install:** [Add to Cursor](cursor://anysphere.cursor-deeplink/mcp/install?name=famulor\&config=eyJ0eXBlIjoiaHR0cCIsInVybCI6Imh0dHBzOi8vYXBwLmZhbXVsb3IuaW8vbWNwIn0%3D) · [Add to VS Code](https://vscode.dev/redirect/mcp/install?name=famulor\&config=%7B%22type%22%3A%22http%22%2C%22url%22%3A%22https%3A%2F%2Fapp.famulor.io%2Fmcp%22%7D)
**Global:** Cursor **Settings → Tools & MCP → New MCP Server** (opens `~/.cursor/mcp.json`)
**Project:** create `.cursor/mcp.json` in your project root.
```json theme={null}
{
"mcpServers": {
"famulor": {
"type": "http",
"url": "https://app.famulor.io/mcp"
}
}
}
```
Refresh MCP in settings after saving. Sign in to Famulor in the browser when prompted.
### Windsurf
`~/.codeium/windsurf/mcp_config.json`
```json theme={null}
{
"mcpServers": {
"famulor": {
"serverUrl": "https://app.famulor.io/mcp"
}
}
}
```
### VS Code
`.vscode/mcp.json`
```json theme={null}
{
"servers": {
"famulor": {
"type": "http",
"url": "https://app.famulor.io/mcp"
}
}
}
```
### Cline
**Cline extension → MCP Servers → Configure**
```json theme={null}
{
"mcpServers": {
"famulor": {
"url": "https://app.famulor.io/mcp"
}
}
}
```
### Continue
`~/.continue/config.yaml`
```yaml theme={null}
mcpServers:
- name: famulor
type: streamable-http
url: "https://app.famulor.io/mcp"
```
### Zed
`~/.config/zed/settings.json`
```json theme={null}
{
"context_servers": {
"famulor": {
"command": "npx",
"args": ["-y", "mcp-remote@latest", "https://app.famulor.io/mcp"]
}
}
}
```
## Try it
Start a new chat with the Assistant & History profile and ask, for example:
"List my assistants and summarize how each one is configured."
"Read my last 5 calls and tell me what my assistant got wrong."
"Show the latest WhatsApp and Instagram conversations that need attention."
"Summarize the latest email thread with this customer."
With the **full developer endpoint** in a trusted developer client, you can also use prompts such as:
* *"Create a German sales assistant using GPT-4.1-mini and the Susi voice"*
* *"Start campaign #42 and add these 50 leads"*
* *"Show me all calls today where the goal wasn't reached"*
* *"What were my last calls?"*
## Security & privacy
* **OAuth 2.1** with a branded consent screen — the hosted flow does not require an API key.
* **Scoped to your account** — the connector can only see and change your own data.
* **Secrets masked** — auth tokens stored on your tools are never returned in plain text.
* **No chat-history harvesting** — the connector acts only on your Famulor resources.
* Privacy policy: [famulor.io/privacy](https://www.famulor.io/privacy).
## Self-hosting
To run your own instance instead of the hosted server, see [MCP Server — Self-hosting](/en/mcp/server#self-hosting).
## FAQ
This page covers **ChatGPT**, **Claude**, CLI agents, and other MCP clients such as Cursor or
VS Code. For a full connector walkthrough with screenshots, see
[Claude & ChatGPT Connector](/en/automation/mcp-connector).
No. The hosted MCP server uses your normal Famulor account through OAuth. API keys remain
available for server-to-server REST API integrations, but they are not part of this connector flow.
The Assistant & History profile is limited to your authenticated workspace and has no write,
purchase, send, call, campaign, delete, telephony, settings, or billing tools. The full developer
endpoint should be used only in a trusted client with confirmations enabled.
No. The Assistant & History profile cannot place calls, send messages, start campaigns, buy
phone numbers, or perform any other balance-consuming action. The full developer endpoint can.
## Troubleshooting
### OAuth / sign-in fails
* Sign out of Famulor in the browser, then start the connector authorization again.
* Try signing in again — tokens expire after 30 days.
* For ChatGPT, ensure **Developer mode** is on and OAuth is selected.
### Server not connecting
* For ChatGPT/Claude, use `https://app.famulor.io/mcp?profile=assistant-history`. The full developer endpoint remains `https://app.famulor.io/mcp`.
* Check health: [https://app.famulor.io/health](https://app.famulor.io/health)
* Restart your client and refresh MCP servers (Cursor: **Settings → MCP → Refresh**).
### Tools not appearing
* Complete OAuth sign-in after adding the server.
* In ChatGPT, ensure the **Famulor** app is selected for the current chat.
Related pages: [MCP Server](/en/mcp/server), [Claude & ChatGPT Connector](/en/automation/mcp-connector), [Famulor Skill](/en/mcp/famulor-skill).